

Did you know that Italian-American dishes like manicotti are favorites in many American homes? Baked manicotti is a comfort food that everyone loves, great for family meals or big events. My classic manicotti recipe shows you how to get a golden-brown, bubbly top that will wow everyone.
I’ll show you how to make this tasty dish, from picking the right pasta to layering it with marinara sauce and mozzarella cheese. You can find more recipes like this on our site. Try my manicotti recipe for a meal that’s sure to please.
Key Takeaways
- Learn how to make a classic manicotti dish that’s baked to perfection.
- Discover the secrets to achieving a golden-brown, bubbly top.
- Understand the importance of layering marinara sauce and mozzarella cheese.
- Explore tips for selecting the right pasta for your manicotti.
- Find out how to make this comforting meal for your family gatherings.
What is Manicotti?
Manicotti comes from Italian cuisine and is known as “little sleeves” in Italian. It’s a key part of Italian-American food.
Origin and History of Manicotti
Manicotti started in Italy, in the Campania region. It was made to use up leftover pasta, cheese, and meat. Now, it’s a favorite dish filled with ricotta cheese and baked in tomato sauce.
Italian immigrants brought manicotti to the US in the mid-20th century. It quickly became a favorite in many Italian restaurants.
Traditional Ingredients Used
Manicotti uses big pasta shells made from durum wheat semolina. The filling is ricotta cheese, Parmesan, and eggs, with herbs like parsley and basil.
The sauce is key, with marinara and Alfredo being favorites. Marinara has tomatoes, garlic, and herbs for a tangy taste. Alfredo is creamy and rich.
Ground meat or sausage adds protein, and mozzarella cheese is melted on top before baking.
Essential Ingredients for Your Manicotti Recipe
The key to a great manicotti dish is its ingredients. Each part plays a big role in the taste and feel of the meal.
Pasta Choices: Fresh vs. Dried
The pasta is the heart of manicotti. You can pick between fresh and dried shells. Fresh pasta is soft and tastes milder. Dried pasta is stiffer and easier to find.

Filling Options: Ricotta, Meat, and More
The filling lets you be creative. Ricotta cheese is a top pick, mixed with Parmesan, eggs, and spices. Adding ground meat or sausage boosts the flavor.
For veggies, try spinach, mushrooms, or other greens. This makes the dish fit many tastes.
Sauce Selections: Marinara and Alfredo
The sauce changes the dish a lot. Marinara sauce is tangy and pairs well with ricotta. Alfredo sauce is creamy and rich, perfect for a special treat.
You can mix both for a unique taste.
Preparing the Manicotti Shells
To make perfect manicotti, it’s key to know how to cook and handle the shells right. Whether you’re using dried or fresh manicotti, how you prepare the shells matters a lot. It can really affect how good your dish tastes.

Cooking and Handling Dried Manicotti
Dried manicotti needs careful cooking to get the right feel. Here’s how to cook dried manicotti:
- Start by boiling a big pot of salted water.
- Slowly add the manicotti shells to the boiling water, stirring now and then to keep them from sticking.
- Cook the manicotti as the package says, usually 8-10 minutes, until they’re al dente.
- After cooking, drain the manicotti and rinse them with cold water to stop cooking.
- Be gentle when handling the cooked manicotti to avoid breaking them.
Tip: Don’t overcook the manicotti. They should still be a bit firm to hold the filling well.
Tips for Using Fresh Manicotti
Fresh manicotti needs a different method. Here are some tips for fresh manicotti:
- If you’re using fresh manicotti, gently separate the shells and check for any damage.
- Fresh manicotti usually doesn’t need cooking before filling, but always check the package instructions.
- Be careful with fresh manicotti as they can tear easily.
Fresh manicotti has a softer texture and can make your dish taste better. By following these tips, you can make sure your manicotti shells are ready for filling and baking.
Crafting the Perfect Filling
A great filling can turn manicotti into a true masterpiece. It’s where you add flavors, textures, and nutrients. This makes the filling key to the dish’s success.
Classic Ricotta Filling Recipe
Ricotta filling is a classic choice for manicotti. You’ll need ricotta cheese, Parmesan cheese, egg, salt, and Italian seasoning. Mix these in a bowl until smooth. Adding chopped parsley or basil can add freshness.
For a similar taste, check out the Knorr Spinach Dip. It’s creamy and flavorful, just like ricotta filling.
Using top-quality ricotta and Parmesan cheese is important. The egg helps the mixture stick together. Salt and Italian seasoning add depth. Mixing well ensures every bite tastes the same.
Adding Proteins or Vegetables to the Mix
You can also add proteins or vegetables to ricotta filling. Cooked sausage or ground beef make it meatier. Sautéed spinach, mushrooms, or bell peppers add new flavors and textures.
Tips for Customization: Think about what you like. Vegetarians can add roasted vegetables. Meat lovers might like cooked sausage. Always use fresh and high-quality ingredients for the best taste.
Assembling Your Manicotti
Assembling manicotti is an art that needs patience and technique. It’s the step where all your ingredients come together. This makes a dish that looks good and tastes great. I’ll show you how to stuff your manicotti shells and layer the sauce for the best flavor.

Stuffing Techniques for Even Distribution
To stuff manicotti shells well, you need to spread the filling evenly. First, make your ricotta filling. Then, use a piping bag or a zip-top plastic bag to fill the shells. Make sure they’re full but not too full.
Tips for Stuffing:
- Use a gentle touch to avoid breaking the shells.
- Fill the shells just before assembling to prevent them from drying out.
- If using a piping bag, you can chill it in the fridge for a few minutes to firm up the ricotta, making it easier to pipe.
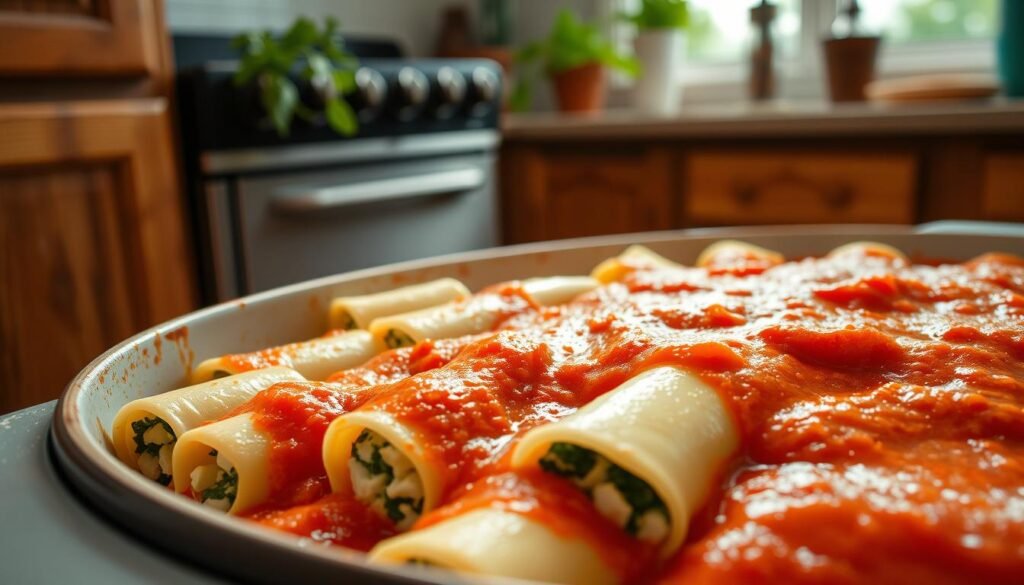
Layering Sauce for Maximum Flavor
Layering the sauce right is key for great flavor in your manicotti. Start with a thin layer of sauce at the bottom of the baking dish. This stops the manicotti from sticking and adds flavor from the bottom up.
| Sauce Layer | Description | Flavor Impact |
|---|---|---|
| Bottom Layer | Thin layer of sauce | Prevents sticking, adds flavor |
| Middle Layer | Manicotti shells filled with ricotta | Main flavor component |
| Top Layer | Generous layer of sauce and cheese | Enhances flavor, adds texture |
After placing the filled manicotti in the baking dish, cover them with a generous layer of sauce. You can use marinara or Alfredo sauce, or a mix of both for a creamy and tangy flavor. Top with mozzarella cheese for a golden, bubbly crust during baking.
The key to a great manicotti is in the layering – ensuring each component is well-represented in every bite. By following these steps, you’ll get a dish that’s not only delicious but also looks great.
Baking Your Manicotti
After you’ve put together your manicotti, it’s time to bake it. This step is more than just putting it in the oven. Knowing the best baking temperatures and times is key. You also need to decide if you should cover it while it bakes.
Ideal Baking Temperatures and Times
The right temperature for baking manicotti is 375°F (190°C). At this heat, it should bake for 25-30 minutes in a standard dish.
Remember, the type of cheese you use affects baking time. Mozzarella, for example, can brown quickly. So, you might need to adjust the baking time to avoid over-browning.
| Baking Temperature | Baking Time | Result |
|---|---|---|
| 375°F (190°C) | 25-30 minutes | Golden-brown top, well-cooked filling |
| 350°F (175°C) | 35-40 minutes | Less browning, more even cooking |
Covering vs. Uncovering: Pros and Cons
Deciding whether to cover your manicotti while baking depends on what you want. Covering it keeps moisture in and the filling warm. But, it stops the cheese on top from browning.
Baking it without a cover gives you a crispy, golden top. If you like this, bake it uncovered the whole time. Or, cover it for most of the time and remove the cover for the last 5-10 minutes for browning.
For more tips on balancing flavors and textures, check out this hot spinach artichoke dip recipe. It also involves baking cheesy, savory ingredients to perfection.

Serving Suggestions
Now that your manicotti is perfectly baked, let’s explore some delightful ways to serve it. Serving manicotti can be an enjoyable experience. With a few simple suggestions, you can elevate your meal to a whole new level.
Perfect Pairings: Salads and Bread
To create a well-rounded Italian-inspired meal, consider pairing your manicotti with a fresh salad and some crusty bread. Here are some perfect pairing ideas:
- A simple green salad with a light vinaigrette dressing
- A Caprese salad featuring fresh mozzarella, tomatoes, and basil
- Garlic bread or breadsticks for a satisfying crunch
- Focaccia or Ciabatta for a more rustic experience

Wine Recommendations for Manicotti
When it comes to wine pairings, manicotti can be matched with a variety of wines to suit different tastes. Here are some wine recommendations that complement manicotti nicely:
- Pinot Grigio: A crisp and refreshing white wine that pairs well with lighter manicotti fillings.
- Chianti: A medium-bodied red wine that complements richer, meat-based manicotti fillings.
- Vermentino: Another white wine option that works well with herbal notes in the filling.
These pairings will enhance your dining experience and impress your guests.
Storing and Reheating Leftovers
Manicotti is perfect for making ahead of time. It stays delicious even after reheating. Knowing how to store and reheat it is key, whether for a big family or meal prep.
Best Practices for Storage
Keep your manicotti fresh by storing it right. Cool it down, then cover it with plastic wrap or foil. Put it in the fridge within two hours. If you won’t eat it in three days, freeze it.
To freeze, wrap it in plastic or foil and then in a freezer-safe bag. Label the bag with the date so you know how long it’s been there.
Portioning out individual servings is smart. It makes reheating easier and keeps leftovers moist. Wrap each serving in plastic or foil and store in an airtight container.
How to Reheat Without Losing Flavor
You can reheat manicotti in the oven or microwave. For the oven, preheat to 350°F (175°C). Put the manicotti in a dish, cover with foil, and heat for 20-25 minutes.
For a single serving in the microwave, place it on a safe dish. Cover with a safe lid or plastic wrap. Heat on medium for 1-2 minutes, stirring as needed.
To keep it moist and flavorful, add extra sauce before reheating, if in the oven. This helps keep the pasta and filling moist.
By storing and reheating your manicotti right, you can enjoy it for days. It’s great for meal prep or family dinners.
Variations on the Classic Recipe
The classic manicotti recipe is versatile and can be changed to fit different tastes and diets. You can make two-tone manicotti with different sauces for a beautiful look.
Diverse Sauce Options
Using marinara and Alfredo sauces can bring a rich flavor to the dish. This mix-and-match approach meets different tastes at the table.
Plant-Based Alternatives
For a vegetarian version, try a filling of spinach, mushrooms, and ricotta or cottage cheese. For vegan options, use tofu or cashew-based cream cheese. This way, everyone can enjoy this Italian favorite.
Trying these variations not only boosts the flavor but also makes the dish more welcoming for all dietary needs.